Input Action
What is the Input Action?
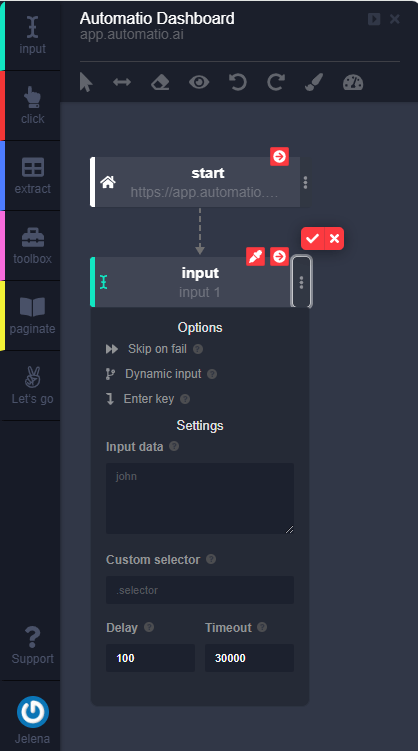
The Input Action allows you to automate the process of typing data into fields on a webpage. It’s ideal for tasks like filling out forms, entering search queries, or inserting text into any input field. With additional options, it can handle dynamic data, simulate pressing Enter, and much more.

How to Use the Input Action
- Select the Input Action:
- Click the Input icon from the sidebar in the Automatio Chrome Extension.
- Choose the Target Field:
- Hover over the desired input field. The field will highlight in yellow.
- Click the field to select it, which will now highlight in green, confirming your selection.
- Enter Data:
- Add the text or value you want to input in the Input Data field (e.g., "Software Engineer" or "Contact Form Name").
- Name the Action:
- Assign a descriptive name to the action (e.g., "Input Email," "Input Subject," or "Input Message"). This helps you easily identify each action in your workflow, especially if you have multiple Input Actions.
- Save the Action:
- Click the Check Icon to save the action.
- Your input action is now ready to use, and you can move on to the next action in your workflow.
Advanced Options in Input Action
The Input Action comes with several advanced settings to customize its behavior:
-
Skip on Fail: Automatically skips this action if the selected field is not found on the page.
-
Dynamic Input: Use this option to pull data from external sources, such as:
- Instance: Pull data from another previously created bot (referred to as an instance). This is useful for workflows where one bot generates data that another bot uses as input.
- List: Use data from lists you’ve created in the Automatio Dashboard. Lists allow you to predefine and manage URLs or other data. For more details, refer to the Lists Overview.
- Google Sheets: Connect your Google account to use data from a Google Sheet. Once connected, you can:
- Select a specific sheet.
- Choose a particular tab within the sheet.
- Specify a column or row for the data source.
-
Row Limit and Resume: Choose whether Automatio should repeat rows for nested actions or use new rows for each.
-
Enter Key: Enable this option to simulate pressing the Enter key after filling the input field (useful for search bars without a submit button).
-
Custom Selector: Specify a CSS selector manually if Automatio’s default selector needs adjustments for more precise targeting.
-
Delay: Set a custom delay time (in milliseconds) to pause before moving to the next action. This can help with loading times or avoiding rate limits.
Additional Features
-
Copy Action:
Quickly duplicate the input action for reuse in other steps of the workflow.
-
Disable Action:
Temporarily deactivate the action without removing it, useful for testing or troubleshooting.
-
Remove Action:
Permanently delete the action from your workflow.