Overview of the Dashboard
Overview of the Automatio Dashboard
The Automatio Dashboard is the control center where you manage all your automations, account settings, and data. It provides a simple, user-friendly interface to easily create, monitor, and manage your automation workflows. In this section, we’ll take a closer look at the main features and sections of the dashboard to help you navigate and make the most of Automatio.
Dashboard Layout
When you log into Automatio, you’ll land on the Dashboard. Here’s what you’ll find:
1. Main Navigation Panel
The main navigation panel on the left side of the dashboard provides quick access to Automatio’s core features, making it easy to manage your automations, data, account, and more. Here’s an overview of each option in the sidebar:
- Instances: Access your list of bots (referred to as instances). This is where you can manage, monitor, and edit the bots you've created.
- Lists: Create and manage lists of URLs for bulk scraping. You can manually enter URLs, import a CSV file, or connect to a Google Sheet to populate a list, which can then be used in automations.
- Templates: Save frequently-used automation configurations as templates. This allows you to reuse customized bots with minimal adjustments when needed.
- Payment: View and manage your payment details, billing history, and subscription plans. Here, you can add a payment method, review invoices, and change or cancel your current plan.
- Support: Reach out for assistance by sending a message to Automatio’s support team. Use this section to report issues or ask questions directly.
- Settings: Manage your account preferences, including subscription details, personal information, API keys, activity logs, and proxy settings.
- Notifications: View important alerts, such as automation completion, billing confirmations, and other updates.
- Logout: Log out of your account.
- Automatio Version: Displays the current version of Automatio installed.

2. Instances Overview
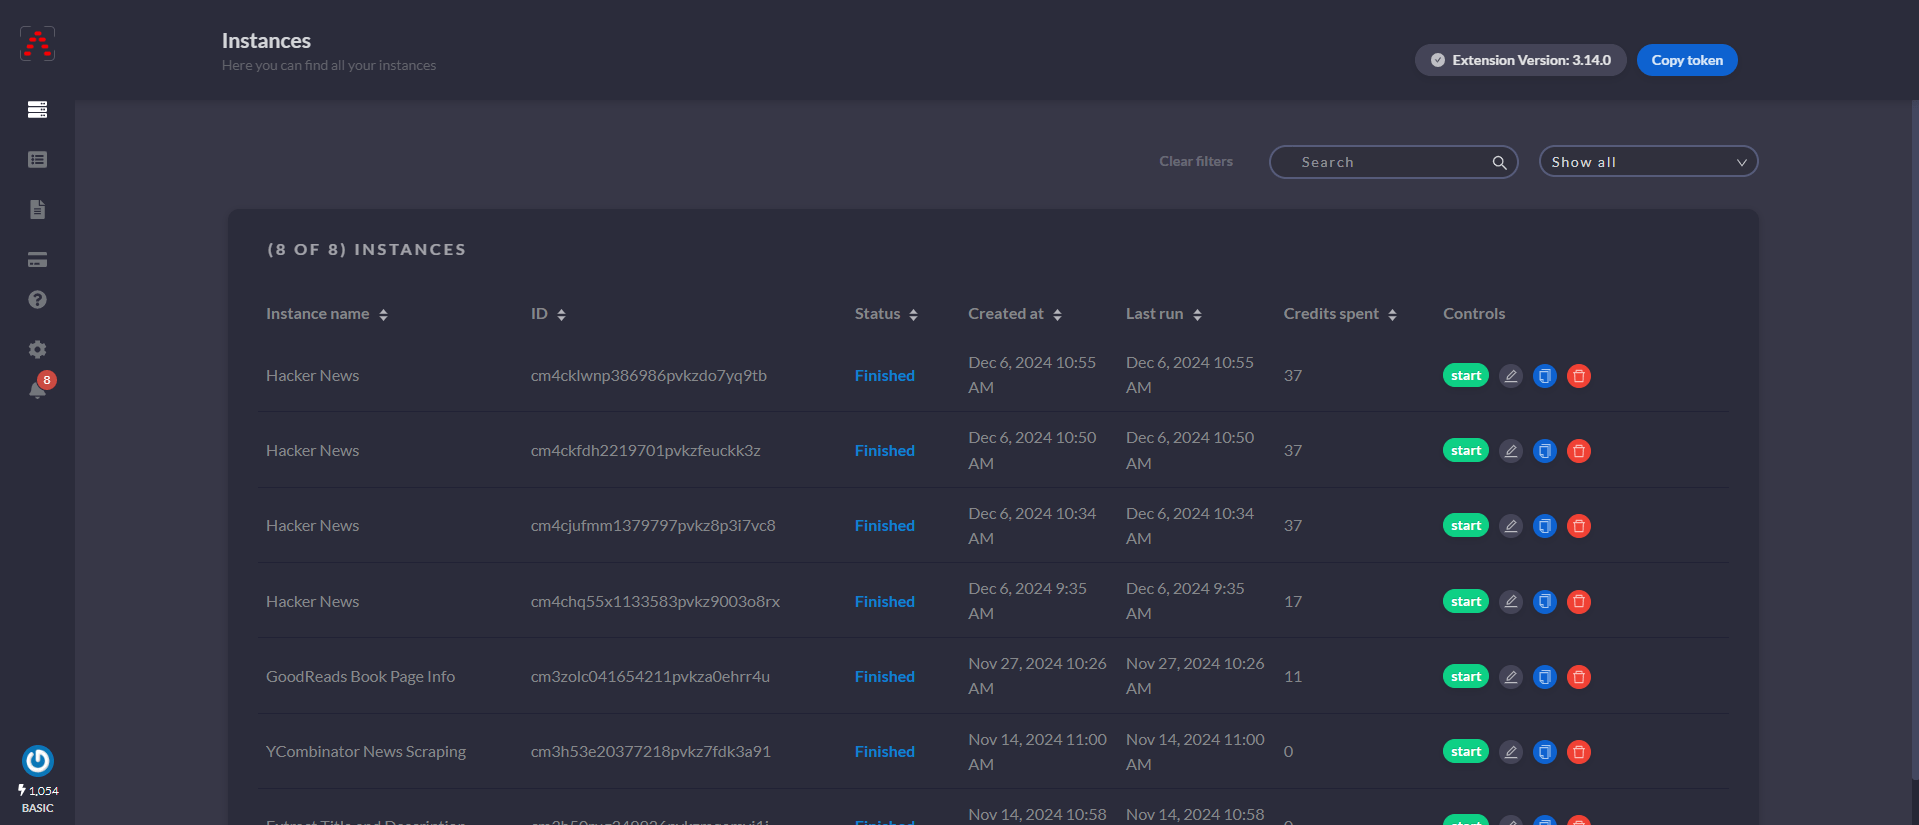
The Instances section is the core of the Automatio Dashboard, providing a table view of all your bots, known as instances. Here, you can monitor, manage, and control each instance with ease. Let’s break down the main elements and controls available in this view.
Instances Table View
When you click on the Instances icon in the sidebar, you’ll see a detailed table of all your bots. Each row represents an individual instance, showing key information and controls:
- Instance Name: The name you assigned to the instance for easy identification.
- Instance ID: A unique identifier for each instance.
- Status: Displays the current state of the instance, such as finished, in queue, running, stopped, etc.
- Created At: The date and time the instance was created.
- Last Run: The most recent date and time the instance was executed.
- Credits Spent: The number of credits used by this instance so far.
Instance Controls
In each row, you’ll find several controls to manage your instances:
- Start Instance: Begin running the selected instance.
- Edit Instance: Modify the settings or actions within the instance.
- Copy Instance: Duplicate the instance to create a similar bot with minimal setup.
- Delete Instance: Permanently remove the instance.
Filtering and Sorting Options
To help you quickly locate specific instances, the Instances section includes filtering and sorting options:
- Search: Search instances by title for quick access.
- Status Filter: Use the dropdown menu to filter instances by status, which includes Requested, Running, Finished, Stopped, Paused, Queued, Canceled, and Scheduled.
Additional Information
In the top-right corner of the Instances page, you’ll find extra details to support managing your instances:
- Extension Version: Displays the current version of the Automatio extension.
- Token: A unique identifier associated with your account. Although Automatio logs you into the Chrome extension automatically when you’re signed into your dashboard, the token is available here if needed for specific authentication purposes.
3. Lists Overview
The Lists section in the Automatio Dashboard allows you to create and manage groups of URLs for bulk scraping or other automation tasks. With lists, you can organize and reuse multiple URLs, simplifying workflows and saving time.
Learn more about lists and how to use them in the Lists Overview.
4. Templates Overview
The Templates section in the Automatio Dashboard lets you save, manage, and reuse automation setups for recurring tasks. By creating a template, you can streamline the setup process and quickly deploy bots for similar tasks without starting from scratch.
Learn more about templates and how to use them in the Templates.
5. Payment and Billing Overview
Manage your subscription, payment methods, and billing details directly from the Payment section in the dashboard. Easily update your card, view your billing history, and explore available plans to fit your needs.
Learn more about payment and billing in the Payment and Billing page.
6. Settings Overview
The Settings section allows you to manage your account details, monitor activity logs, configure API keys, and set up proxy configurations for your automations. Visit the Account Settings page for full details on managing your profile, integrations, and proxy settings.
7. Notifications Overview
The Notifications section provides updates about your account and automations, such as completed challenges, finished instances, and successful payments.
You can view notifications by clicking on the Notifications icon in the sidebar.
Use the Clear All Notifications button at the top to remove current alerts.